Arida Eva evaporative humidifier

Safety instructions
Please read this safety information carefully before use.
Any irresponsible use is not recommended by the manufacturer and may cause fire, electric shock or other damage to persons or property.
- Empty the water before moving it . Make sure the water tank and bottom tray are empty before moving the humidifier.
- Do not use in rooms with high humidity. The humidifier is intended for normal use and must not be used in rooms with high humidity (> 80% RH).
- Use only 220 – 230V voltage. Exceeding the amperage can lead to overheating and thus pose a fire hazard.
- Keep away from sunlight and heat sources. Always place the humidifier on a flat and solid surface with the best possible stability. It is also important that the humidifier is placed well away from heat sources and direct sunlight.
- Do not disassemble any components from the humidifier and avoid unauthorized modifications. The humidifier may only be repaired by qualified personnel with the necessary expertise.
- Recommended ambient temperature is 10°C – 40°C.
- Only use an undamaged original power cord. A damaged power cord must be replaced by an authorized electrician.
- If there is an abnormal sound or smell, turn off the power and unplug the appliance.
- Avoid touching the water during use. Avoid touching the water or parts in the water tank during use.
- Do not use essential oils or additives. Do not add additives or essential oils directly to the water.
- Do not cover the air outlet and air inlet. This may damage the product and reduce its capacity.
- Use only original accessories. Use only original evaporative filters, air filters and other accessories adapted to this model.
- Always unplug before cleaning .
- If not in use for a long period of time, unplug the humidifier, empty the water tank and dry all components. Make sure the humidifier is completely dry.
- Recycle at appropriate collection point. Recycle the product, its packaging and accessories at appropriate collection points for WEEE at the time of disposal.
- Never pull on the cord, only on the plug. Pulling on the cord may cause a short circuit, damage the cord, or cause fire or electric shock.
- Do not operate without an air filter or with a clogged filter. Operation without an air filter or with a clogged filter can damage internal components and reduce the life of the air purifier. This may cause product failure and is not covered by the product warranty.
- Unreachable for children or unqualified persons. The humidifier should not be used by children or persons with reduced physical, sensory or mental capacity.
⚠️ Warning!
– The control panel does not work.
– A fuse or safety switch has blown.
– The power cord or power plug is abnormally hot.
– The humidifier emits a burning smell, abnormal noise or vibration.
– Other abnormal conditions or errors.
Product overview
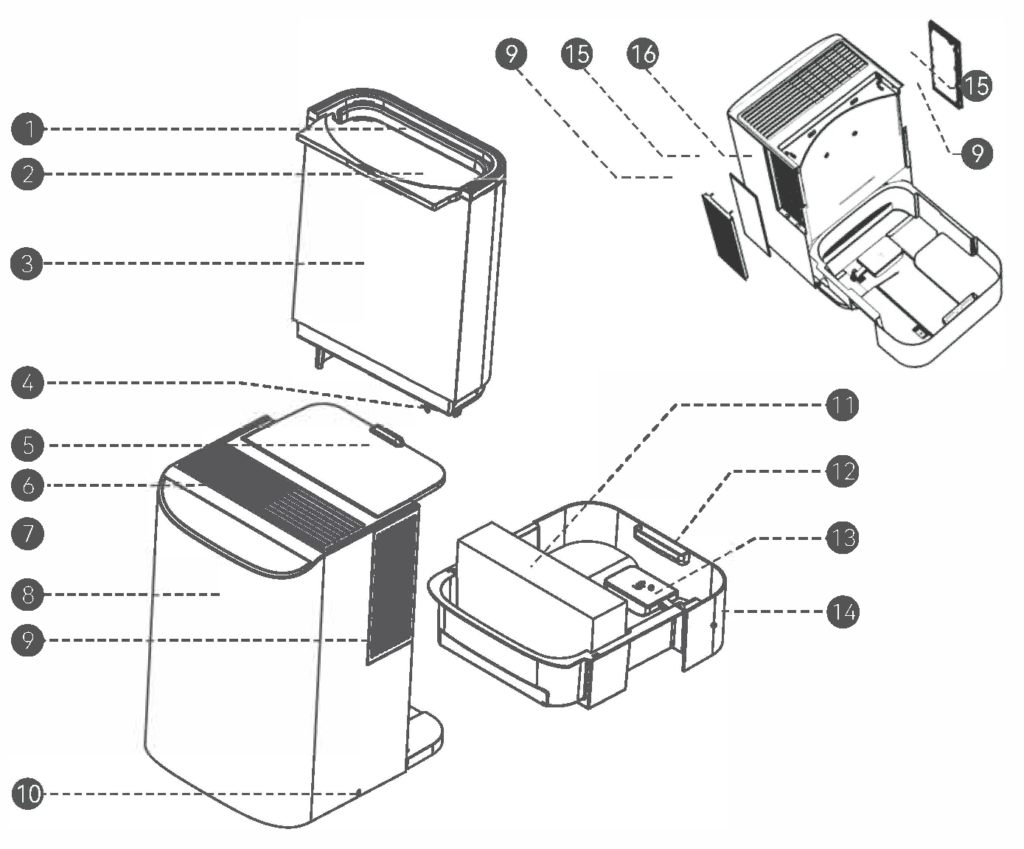
Component overview
- Water tank handle
- Filling hatch
- Water tank
- Cork with valve
- Water tank cover
- Air outlet
- Control panel
- Front cover
- Coarse air filter (must be vacuumed/washed)
- Power cable
- Evaporative filter
- Bottom tank
- Float
- Bottom tank
- Coarse air filter (must be vacuumed/washed)
- Air intake
Features
Using preheating and evaporative humidification technology, the fan operates at high speed. The air is preheated using a PTC heating element, so that the inhaled air is heated before it reaches the evaporative filter. This leads to rapid evaporation of the water on the filter, stimulated by an increased flow of warm air. The result is a significant increase in humidity, which provides effective humidification without the formation of mist.
- Mist-free humidification
- The fan speed is adjustable in three levels.
- Vacuumable pre-filter
- UV germicidal lamp
- Can set the desired humidity
- PTC preheating
- Automatic stop when water tank is empty
- Air drying function that dries the evaporative filter
- Dust cover over the water tank
- Cover over the water tank
- Digital display for temperature and humidity
- Night mode
- Visual light indicator for humidity level
- Child safety
Preparations before use
For optimal humidification, the humidifier should be used in temperatures between 10℃-40℃, with a relative humidity lower than 80%RH, and with clean water with a temperature below 40℃. To improve the performance of the humidifier, no objects should be placed around the air inlet and outlet when using it. Keep a distance of at least 20 cm from the sides of the air inlets. A good distance from walls, furniture, electrical appliances, etc. is important to prevent them from being damaged by the moisture coming out of the top.
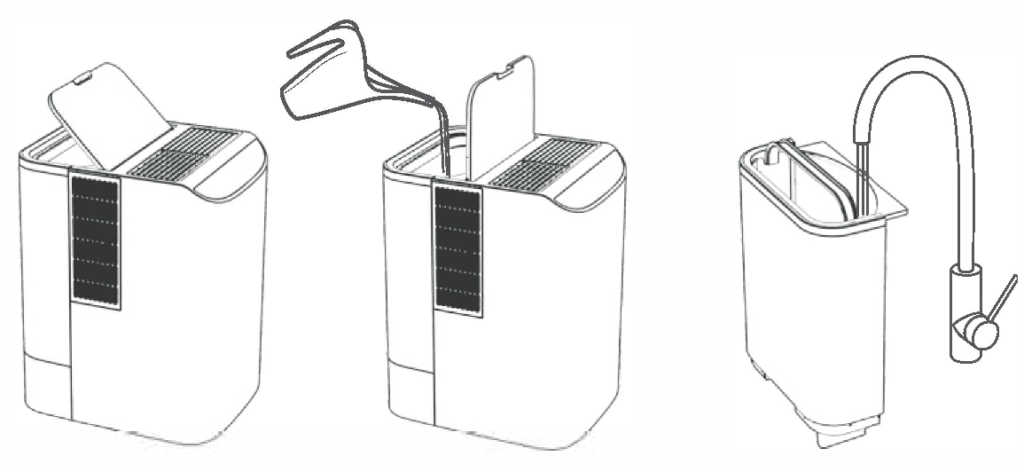
Water refill
⚠️ Warning!
Method 1 :
Open the filler door and pour water directly into the water tank using a liter measure or a flower pot.
Method 2 :
Lift out the water tank and fill the tank with water from the tap.
Use
When you connect the humidifier to the power supply, a beep will sound and it will automatically go into standby mode. Then you need to press the ON/OFF button to start the humidifier.


ON/OFF button
Press to start the unit at normal water level. If the water level is too low, the unit will alarm. The display will flash red every second three times and the unit will then turn off.
Turn off the humidifier and press and hold the ON/OFF button for 3 seconds to activate WiFi connection. Then the WiFi icon on the control panel will start flashing and the humidifier can be added to the Smart Life app.

Effect button
Press to select between three desired power levels. The levels are shown on the display and alternate in the order: low → medium → high → low…….
Hold the button for 2 seconds to activate the child lock. The child lock icon lights up and the other buttons are deactivated. When other buttons are pressed, the icon flashes three times. Hold the button for another 2 seconds to deactivate the child lock.

Automatic operation
Press to activate automatic operation. The humidifier will now automatically adjust the output based on the ambient humidity:
– Below 40%: high power
– 40–55%: medium effect
– 56–60%: low power
– Above 60%: the humidifier stops

Desired humidity
Press to adjust desired humidity. First press displays current %RH. Further presses within 3 seconds increase humidity by 5%RH per press, up to 80%RH.
The next press displays “–” %RH (“Cancel” in the app). This indicates that the selected setting has been reset, and the humidifier will operate continuously at the selected fan speed.

Heating/drying function
Press to turn off PTC heating. Hold for 2 seconds when heating is not in use to activate drying of the evaporative filter.

Hours
Press to set the timer. Each press increases by 1 hour, up to 12 hours. Press and hold for 2 seconds to cancel the selected timer.

UV light and ionization
Press once to activate UV light and ionization. Press again to deactivate the functions.

Night mode
Press once to activate night mode. The audio signals will be turned off and the display will go dark.
Press again to deactivate night mode and display the current status. Hold for 2 seconds to turn off all lights. Press any button to reactivate all lights.
The meaning of the LED colors on the display
🔴 Red : Humidity below 40% RH (dry).
🟢 Green : Humidity 40–60% RH (normal range).
🔵 Blue : Humidity above 60% RH (humid).
🟠 Orange: Drying the evaporative filter. The water tank is emptied and the filter is dried to avoid bacterial growth.
Connecting to WiFi
Preparations
- Connect the machine to an approved power source.
- Make sure your mobile device is connected to 2.4G Wi-Fi. The mobile device and the machine must be within good signal strength from the Wi-Fi router.
Download the app
- Download the app by searching for “Tuya Smart” or “Smart Life” in the App Store or Google Play, and install it.
- Open the app and sign up or log in to your account.
Connect the humidifier to WiFi
- Turn on Bluetooth on your phone for faster and easier pairing.
- Hold the ON/OFF button for at least 3 seconds until the WiFi icon starts flashing on the humidifier control panel.
- If both you and another user are going to control the same device, the original device must be added as yours (or someone else's) as a family member via Family Management in the app.
- Go to the app's Home screen , tap “Add device” or the plus sign in the top right.
- The humidifier will normally appear on the first page under "Add Device" when connection mode is activated.
- If it doesn't automatically appear, you'll need to select the correct device from the list under "Add Manually." Follow the instructions in the app to complete the pairing.
The Wi-Fi icon will appear as a solid light when the connection is successful.

Maintenance
| Interval | Cleaning |
| Once a week (or as needed) | Clean the water container, bottom pan and water tank |
| Once a month (or as needed) | Clean the air filters |
| Once a year (or as needed) | Replace the evaporative filter in the bottom pan |
How to clean the water container , bottom pan and water tank
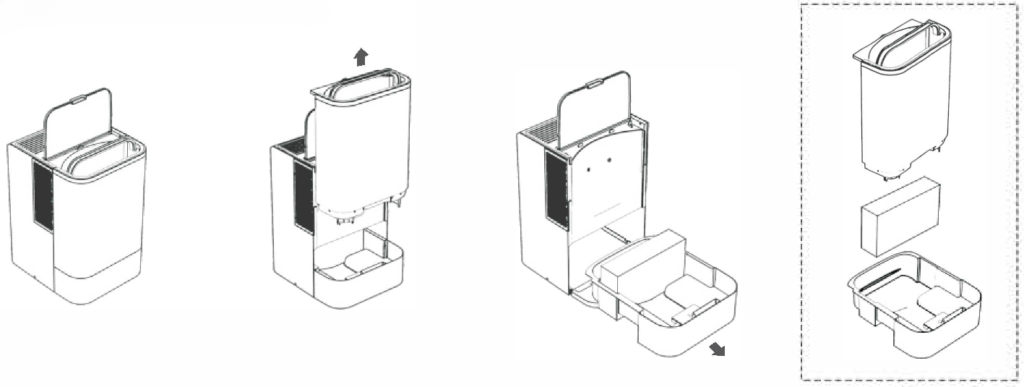
- Remove moving parts in the water container and water tank. These can be rinsed under the tap.
- The water filter, float and cork can be disassembled for more thorough cleaning.
- Clean with a damp cloth. Be careful not to damage seals, electronics, and other components.
- All parts must be assembled correctly after cleaning.
How to clean the air filters

- Remove the water tank.
- Pull the filter covers out to the side, one on each side.
- Vacuum the air filters, wash them in lukewarm water and dry them if necessary.
- Put them back in the humidifier.
If the humidifier is not to be used for a long period of time, you must
- Empty the water tank and water container, and use the drying function to dry the filter.
- Assemble all parts, connect to power and hold the heat/dry button for 2 seconds. The humidifier will now start drying and will stop automatically when finished.
- Make sure the humidifier is completely dry before putting it away.
⚠️ Warning!
The electronic components are located at the bottom of the main body. This must therefore not be immersed in water, only the water tank which is removable.
Technical data
- Voltage: 220–240 V~, frequency: 50/60 Hz
- Nominal power: 480 W
- Nominal evaporation capacity: 1,000 ml/hour (25 °C, 30% RH)
- Noise level: ≤ 45 dB (A)
- Water tank capacity: 8.0 liters
- Gross weight: 5.5 kg
- Net weight: 4.7 kg
- Product dimensions: 270 x 323 x 408 mm
Troubleshooting
| Problem | Possible cause | Possible solution |
|---|---|---|
| The humidifier shows high humidity values | The fan stops and the humidifier measures the internal humidity at the filter. | Allow the humidity in the humidifier to stabilize. Wait a few minutes and the humidity on the display will show the actual humidity it is measuring. |
| The humidifier does not turn on. The humidifier suddenly turns off | The humidifier does not receive power. | Check that the plug is properly inserted into the socket. |
| The indicator ring flashes red. | The humidifier is positioned at too great an angle | Place the humidifier on a flat surface. |
| Lack of water | Fill up the water tank | |
| The water tank is not inserted correctly. | Lift the water tank and place it in the correct position. | |
| The air being blown out smells bad. | The humidifier is brand new. | Open the top lid, remove the water tank and leave the humidifier open in a cool, well-ventilated place for 12 hours. |
| The water is dirty or has been standing still for a long time | Clean the humidifier and refill with clean water. | |
| Old and moldy filter | Replace with a new evaporative filter. Drain the water and dry the filter when the unit is not in use for a long time, and store it in a cool and ventilated place. | |
| Abnormal or loud noise | Too little water in the bottom pan causes resonance | Fill with water |
| The humidifier is missing a water tank and/or evaporative filter. | Insert the water tank and filter correctly | |
| Resonance against the substrate | Place the device on a stable countertop or floor. | |
| There is water in the water tank, but the device indicates water shortage | The float has stuck and does not float up intact with the water level in the bottom tank. | Remove foreign objects, disassemble the float, clean it and reinstall it |
| The water tank cap is not installed correctly. | Lift up the water tank, pour out the water and screw the cap at the bottom of the water tank back on. | |
| The float is not inserted or it is incorrectly installed. | Install the float correctly | |
| The water tank overflows. | Something is blocking the float | Remove and clean the bottom pan and float |
| Something is stuck in the valve in the cork | Unscrew the cap at the bottom of the water tank, clean the threads and screw it back on. |
If the problem persists after trying the suggested solutions, the product may be damaged. Contact the manufacturer or an authorized repairer for service or assistance.