Arida Oslo dehumidifier

Safety instructions
Read all instructions carefully before using the dehumidifier. This dehumidifier is intended for use in a domestic environment only. Any other use is not recommended by the manufacturer and may result in fire, electric shock or other damage to persons or property.
When using electrical appliances, basic safety precautions should always be followed:
- Do not operate the dehumidifier with a damaged cord or plug, after it malfunctions, or if it has been dropped or damaged in any way. Return it to an authorized service center for examination and repair.
- The dehumidifier should always be kept in an upright position to avoid damage. Place it on a flat and stable surface.
- Check the household voltage to ensure it matches the dehumidifier's specified rating before use.
- Use the dehumidifier in an ambient temperature between 1°C and 40°C.
- Make sure that the air inlet and outlet are not blocked or covered.
- Do not place the dehumidifier too close to curtains or other objects – minimum distance 40 cm.
- When using the dehumidifier to dry wet clothes in the room, keep the clothes at a safe distance from the dehumidifier to prevent water from dripping onto it.
- Never place anything on top of the dehumidifier or cover it with any kind of material while it is in use.
- This dehumidifier is intended for use in private homes and light office environments only, and not for commercial, industrial or outdoor use. Never use it in very humid rooms (such as bathrooms).
- To protect against electric shock, do not immerse the dehumidifier, plug or cord in water, or spray it with liquids.
- Never unplug the power cord without first pressing the "ON/OFF" button, as this may damage the dehumidifier.
- Always unplug the dehumidifier when it is not in use or when moving it. To disconnect the power supply, grasp the plug and pull it out of the socket. Never pull on the cord.
- Always empty the water tank before storing the dehumidifier.
- Using the dehumidifier in front of a hot radiator may cause it to not collect water due to the heat from the radiator.
- Do not place the power cord under rugs, rugs, or runners. Route the cord so that it is not in the way and may cause a tripping hazard.
- Never use or store the dehumidifier in direct sunlight.
- Take the dehumidifier to a qualified service technician if it needs repair. Repairs performed by unqualified persons may cause damage to the dehumidifier or personal injury and will void the warranty.
- Avoid using extension cords if possible, as they can overheat and pose a fire hazard. Only use an extension cord if you are sure it is in perfect condition.
- Do not use the dehumidifier without an air filter and ensure that the filter is kept clean to avoid malfunction and voiding the warranty.
- This dehumidifier can be used by children aged 8 years and above and persons with reduced physical, sensory or mental capabilities or lack of experience and knowledge if they have been given supervision or instruction concerning use of the dehumidifier in a safe way and understand the hazards involved.
- Children should not play with the dehumidifier.
- Cleaning and user maintenance shall not be made by children without supervision.
- If the supply cord is damaged, it must be replaced by the manufacturer, its service agent or similarly qualified persons in order to avoid a hazard.
⚠️ Warning!
Features
- Dehumidifier that uses a drying rotor, therefore effective in all temperatures between 1 °C – 40 °C
- Environmentally friendly without harmful gases and quiet in operation
- Dehumidifies approx. 9 liters/day (at 20 °C, 60% RH)
- Water tank capacity: approx. 4 liters
- Automatic dehumidification according to the desired humidity level
- 1–12 hour timer
- Lightweight and portable, with carrying handle
- Removable water tank with handle
- LCD screen showing humidity and temperature
- Energy-saving program with automatic pause and restart according to selected humidity
- Automatic restart in case of power failure
When power returns after a power outage, the unit will continue to run with the settings selected before the outage. - Ionization against basement odors and bad smells
- Automatic damper with wide spread (150°)
Product overview

- Automatic damper
- Air outlet
- LCD
- Control panel
- Water tank level indicator
- Water tank
- Carrying handle
- Air intake
- Air filter
- Drainage hole for hose
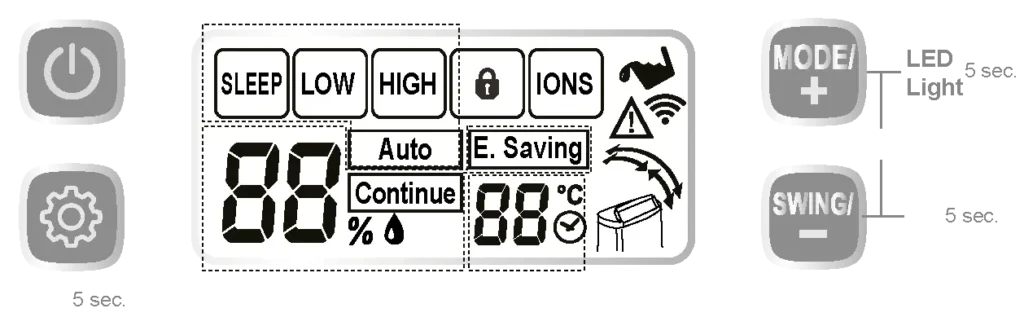
Control panel

- ON/OFF button
- Setting selection
- Mode selection & LED lighting
- Swing & child safety
Press the ON/OFF button to turn the dehumidifier on or off.
During setting selection, you can select the humidity level the dehumidifier should have as its dehumidification target. Hold the button down for 5 seconds to activate the WiFi connection between the dehumidifier and the WiFi router (Smart Life).
When selecting the mode, you can choose whether the dehumidifier should have the fan speed setting "AUTO", "SLEEP", "LOW" or "HIGH". With "AUTO" the dehumidifier will regulate the fan speed itself. By holding the button down for 5 seconds, you can turn the LED lighting in the water tank on or off.
Under Swing & Child Lock, you select which position the air damper should swing to. By holding the button down for 5 seconds, you activate the child lock and lock the control panel (not the ON/OFF switch).
Hold down both mode selection and swing & child lock for 5 seconds to activate ionization.
The control panel shows the humidity it measures in the room, the temperature it measures, and indicators for child lock, ionization, full water tank, WiFi activation, error message, and damper setting.
Location

- Air outlet
- Air intake
To ensure good air circulation in the room and that the dehumidifier gets enough air, there must be at least 20 cm of space to the sides and back. The front needs at least 50 cm of space , and above the dehumidifier you must have at least 60 cm of space to clothes, curtains or other objects.
Place the dehumidifier in an upright position on a stable, flat surface. Make sure the dehumidifier is sufficiently far away from walls or furniture (see illustration on the right).
Keep clothes and other items at least 20 cm away from the dehumidifier's air outlet to prevent water from dripping into the dehumidifier.
Where should you place the dehumidifier? For best results, it should be placed in a central location, such as in a hallway or corridor.
Do not place it directly in front of a radiator or in direct sunlight.
For safe use
- Do not insert small objects into the device as this may damage it and pose a hazard.
- Keep sufficient distance around the device, as shown above.
- Do not remove the water tank while the unit is operating, as this may cause water leakage.
- Make sure the water tank is properly installed. If the tank is full or not properly installed, the warning light will illuminate and the unit will stop.
How to use the dehumidifier
🔌 On/Off
The device turns on with the last settings used, including mode, humidity, and backlight – except for the timer.
When power is restored after a power outage, the appliance will resume with the previous settings (including timer) before the power outage.
🎛️ Mode
Mode selection:
LOW → HIGH → SLEEP → AUTO
Press once for each mode to select the desired setting:
- LOW : Low speed and low heat output
- HIGH : High speed and high heat output
- SLEEP : Low speed, low heat output and dimmed screen (default is L2, but will display as L1 or L0 if previously set lower)
- AUTO:
- Runs on low power when the humidity in the room is within 10% above the selected value
- Runs on high power if humidity exceeds 10% above selected value
- Switches back to low power when humidity is within 5% above selected value
🔽 Note: If you select continuous mode and then automatic mode, the humidity will be set to 50%.
When automatic mode is selected, continuous mode is not available.
🔄 Advanced settings
Select setting for:
- Humidity → Time → Screen Brightness
The selected item flashes for 5 seconds and you use the arrow keys (▲ / ▼) to adjust.
🌡️ Humidity setting
Press the Select button once to display the current humidity setting (or “CO” for continuous), then use ▲ or ▼ to scroll through:
40% → 45% → 50% → … → 70% → 75% → 80% → CO (continuous)
The display then shows the room's actual humidity after 5 seconds without any keypress.
⚡ E. Economy mode (automatic power saving)
When the desired humidity is reached:
- The appliance flashes “E.Saving” and turns off the heating element and fan.
- Cools for 2 minutes and then turns off for 30 minutes.
- After 30 minutes, the fan starts for 5 minutes to measure the humidity again:
- If the humidity has increased by 5%, the device restarts.
- If not, it will remain off for another 30 minutes.
⏲️ Timer setting
Press the selection button a second time to display ⏰ and flashing time setting (or remaining time),
and then press ▲ or ▼ to scroll through the following:
1 hour → 2 hours → … → 12 hours → — (continuous operation)
After setting (or 5 seconds without pressing a button), ⏰ will be displayed if a timer is active,
and the screen will show the room temperature.
You can check the remaining time (flashing for 5 seconds) by pressing the selection button 2 times when ⏰ is visible.
🌡️ Temperature display and operating temperature
The device operates within 1–40°C, and the display usually shows the room temperature.
- At temperatures above 43°C (displays "Hi") or below 1°C (displays "Lo") the unit stops.
- It will start again when the temperature is within 3–40°C.
- In “Hi” or “Lo” mode, only the on/off button works.
💡 Screen Brightness (LCD Dimmer)
Press the selection button a third time to display the brightness level and flashing numbers,
and then press ▲ or ▼ to select:
L0 (no backlight) → L1 → L2 → … → L5 → H (full brightness)
After setting (or no key press for 10 seconds), the brightness is automatically adjusted to L0.
You can only select L0, L1 or L2 in SLEEP mode.
This setting also affects LOW and HIGH modes if they are within L0–L2.
⚠️ When the water tank is full, an error occurs, Wi-Fi pairing occurs, or the device is outside of operating temperature (1-40°C), the screen will remain on.
↔️ Swing setting
Press the swivel button to select the desired swivel angle:
- Upward (50°–150°)
- Forward (0°–60°)
- Wide (0°–150°)
- Stop (optional angle)
🌀 Ionizer
Press and release the selection button and the LED light button simultaneously to turn IONS on/off.
The frame around the IONS symbol appears or disappears.
🔒 Child lock
Hold down the rotary button for 5 seconds to activate or deactivate the child lock.
When activated, all buttons except the on/off button are disabled.
🌈 3-level humidity indicator (LED)
In addition to the digital moisture display, the unit has a 3-level LED light in the tank window:
- Green light : below 50%
- Blue light : 50–65%
- Red light : over 65%
You can turn the indicator on/off by holding the LED button for 5 seconds.
📶 WiFi indicator in display
- Flashing WiFi icon : WiFi pairing enabled, searching for device
- Stable WiFi icon : WiFi is connected
- WiFi icon off : connection failed (no WiFi connected)
Connecting to WiFi
Preparations
- Connect the machine to an approved power source.
- Make sure your mobile device is connected to 2.4G Wi-Fi. The mobile device and the machine must be within good signal strength from the Wi-Fi router.
Download the app
- Download the app by searching for “Tuya Smart” or “Smart Life” in the App Store or Google Play, and install it.
- Open the app and sign up or log in to your account.
Connect the dehumidifier to WiFi
- When the device is turned on, it will automatically start WiFi pairing for 5 minutes, and the WiFi icon will flash.
If a smart device is already paired, the icon will turn solid. - You can hold the program button for 5 seconds to start a new Wi-Fi pairing.
This deletes previous pairing.
If both you and another user are going to control the same device, the original device must be added as yours (or someone else's) as a family member via Family Management in the app. - Go to the app's Home screen , tap “Add device” or the plus sign in the top right.
- Select the correct device from the list and make sure the device is in EZ mode . Follow the instructions in the app to complete pairing.
The Wi-Fi icon will appear as a solid light when the connection is successful. - Turn on Bluetooth on your phone for faster and easier pairing.

Emptying the water tank
- When the water tank is full, the water tank symbol starts flashing and the unit stops after a few minutes.
- Do not move or remove the tank while the unit is operating - this may cause water leakage, damage to the unit or electric shock.
- To remove the tank, carefully pull it out and lift it by the handle.
- Empty the water, clean the tank, and replace the lid and tank correctly.

🔹 Note:
- Clean the tank with clean water when necessary. Do not use solvents, abrasives or hot water.
- Do not remove or damage the float in the tank - the unit will not function properly.
- The water tank symbol flashes if the tank is not correctly inserted.
Continuous drainage with hose

You can use a hose with an internal diameter of 12 mm for continuous drainage of the water to a drain or sink.
Here's how:
- Use a screwdriver to remove the round seal on the back of the device.
Attach the hose to the connector through the hole. - Route the hose to a drain – avoid sharp bends and backslopes.
🔸 Note: The tank must be correctly positioned in the dehumidifier before connecting the hose.
🛠️ Maintenance
Cleaning the device
- Turn off the device, wait for the fan to stop, and unplug the power cord.
- Wipe the surface with a soft, damp cloth.
- Dry thoroughly with a towel after cleaning.
- Do not wash the device with water and make sure that water does not drip into the air inlet or outlet.
Cleaning the filter
If the filter is covered with dust, airflow and performance will be affected.
It is recommended to check and clean the pre-filter once a month.
Here's how:
- Turn off the unit and remove the filters.
- The pre-filter can be washed and dried carefully with a cloth.
- Reinstall the filters: First place the pre-filter on the frame, then insert it into the unit.

Before storage
- Turn off the unit and wait until the fan stops. Unplug the power cord.
- Empty and dry the tank. Let the unit drain for about a day.
- Clean the filter and the unit. Cover to avoid dust.
Store upright in a cool, dry place. - Do not expose to direct sunlight.
Technical data
| Power consumption (@230V) | 740W (High) / 420W (Low) |
| Power supply | 220–240V ~ 50Hz |
| Dehumidification capacity | 9 liters / day |
| Water tank capacity | 4 liters |
| Operating temperature range | 1 – 40°C |
| Dimensions (W × D × H) | W317 × D213 × H499 mm |
| Net weight | 6.8 kg |
| Gross weight | 7.8 kg |
Troubleshooting
| Problem | Possible solution |
|---|---|
| The fan runs for about 2 minutes after the unit is turned off | This is normal and not a cause for concern. |
| The device only works at room temperature between 1-40ºC. It stops outside this range (“HI” or “Lo”) | This is normal. The device is designed to operate within this temperature range. |
| The device emits an unusual odor | This is a normal and harmless by-product of the Zeolite desiccant. Odors can occur when the zeolite releases odors it has absorbed from e.g. smoke, cosmetics and furniture. |
| The error message icon flashes, indicating a blockage in the air intake or outlet | The filter is probably dirty or clogged. Clean or replace the filter. |
| WiFi light is blinking continuously and unable to connect | Make sure the WiFi network is stable |
⚠️ WARNING: If the problem persists, contact your dealer or a qualified service technician. Do not attempt to repair the unit yourself - this may result in electric shock and void the warranty.