Arida Venti 160 WiFi Single Room Ventilator

Before installation
- This product is intended for indoor use, with an outdoor temperature between -20°C and +50°C.
- The product must only be used according to the manufacturer's recommendations.
- Unpack the product with care.
- Follow the safety instructions for the power tool during assembly.
- Do not use the product with a damaged cable or extension cord.
- Always disconnect the product from the power supply before installation or maintenance.
- Keep the product's power cord away from heat sources.
Installation and connection operations must only be carried out by qualified personnel following appropriate safety information.
The location must prevent access by unsupervised children.
Where can you use this room fan?
- The room ventilator is designed to exchange air in apartments, detached houses, hotels, cafes and other domestic and public buildings. The room ventilator is equipped with a ceramic heat exchanger and a fan that both supplies fresh air and extracts air with energy recovery.
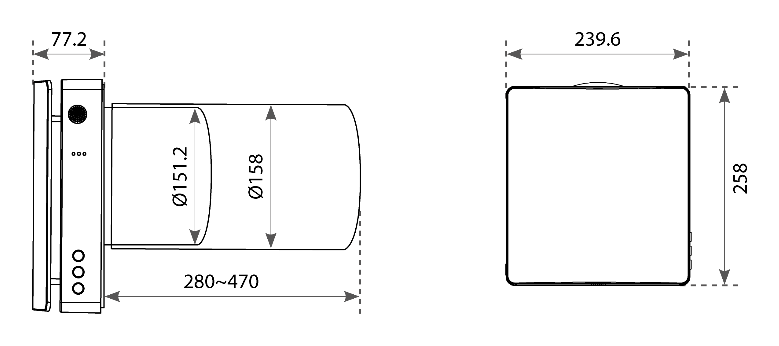
- The fan is designed for through-wall installation. The supplied wall bushing allows installation in walls up to 270 mm thick. Using the extension pipe (optional accessory), the wall can be up to 700 mm thick.
- The ventilator is designed for continuous operation.
- The air must not contain flammable or explosive substances, chemical vapors, coarse dust, soot and oil particles, sticky substances, fibrous materials, pathogens or other harmful substances.
To prevent dust from settling and accumulating in the room, the room fan must not be installed in places where the air duct may be blocked by blinds, curtains, drapes and other elements. Blocking elements can prevent normal air flow in the room, resulting in reduced efficiency.
Read this before installing the room fan
- This room fan is designed for indoor use with an ambient temperature between – 20 °C and +50 °C and a relative humidity below 80%.
- This room fan is classified as a Class II electrical appliance with an (IP) rating of IPX4.
- The product design is constantly being improved, and some models may therefore differ slightly from the models described in this manual.
- The room ventilator consists of a telescopic air duct with adjustable length regulated by the position of the inner air duct inside the outer air duct, the ventilation unit and the ventilation hood.
- The fine filter, pre-filter and ceramic energy regenerator are located inside the inner duct. The filters are designed to clean the supply air and prevent foreign objects from entering the regenerator and fan.
- The ceramic heat exchanger extracts energy from the exhaust air to heat or cool the supply air.
- The heat exchanger is equipped with a pull cord on the inside to make it easier to pull it out of the room ventilator. The heat exchanger is installed on an insulating material that also serves as a sealant.
- The room fan can be installed from inside the room it is to be installed in.
Installation
For best possible performance, we recommend that the indoor unit is mounted with a minimum distance of 15 cm from the outer edge of the indoor unit to the wall/ceiling.
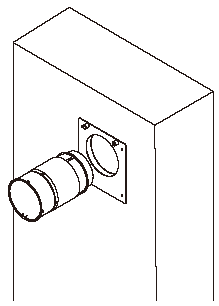
1. Drill the hole
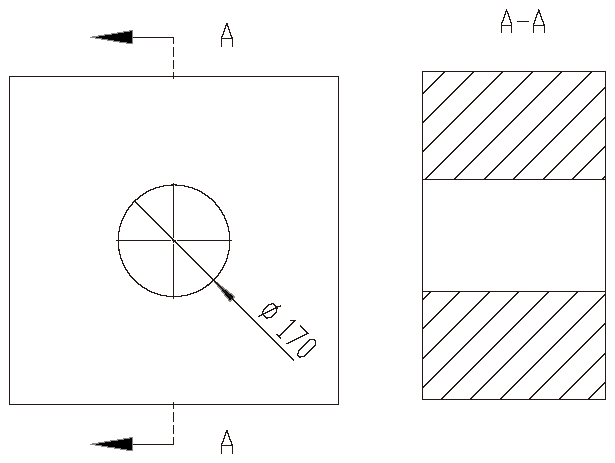
Drill a Ø160 – 170 mm round hole horizontally through the entire wall.
Tip! Use a core drill, or a drill with a hole saw and extension.
2. Install the rubber boot
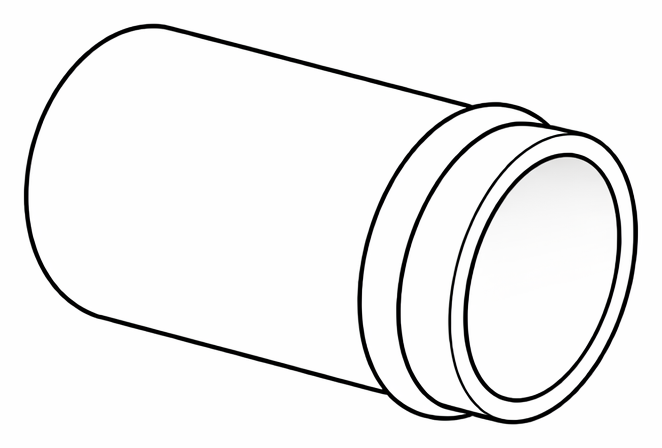
Thread the included rubber sleeve over the PVC pipe, so that it seals between the plastic in the wall and the pipe.
3. Fix the pipe to the wall
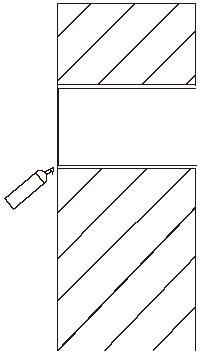
Then push the pipe with the rubber sleeve into the wall. Adjust it so that it fits the wall and is perfectly straight. Use construction foam, acrylic or glue to attach the pipe evenly so that it is flush with the inside wall.
Let the fixing material dry.
4. Adjust the mounting plate
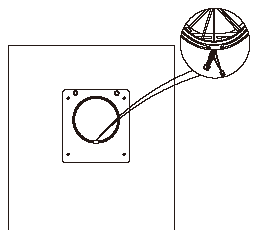
Thread the core loosely into the mounting plate for the indoor unit, and then insert the core with the mounting plate into the pipe as one piece. The connection plugs should face downwards.
5. Screw the mounting plate in place
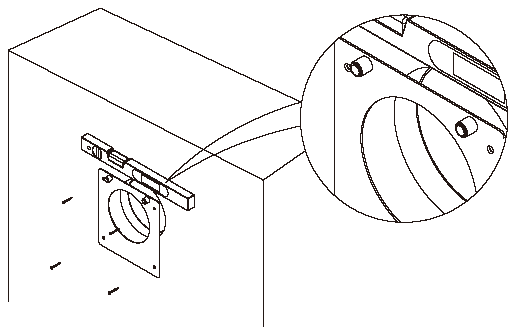
Use a spirit level when attaching the mounting plate.
Important! Pull the core out slightly, and make sure that the core is not in tension with the mounting plate. The core must be removed for maintenance and must be loose.
6. Connect the indoor unit to the core

Hold the indoor unit while connecting the connectors together.
Tip! Rotate the indoor unit a few times clockwise to twist the wires. This will help them stay in place more easily.
8. Place the wires in the groove
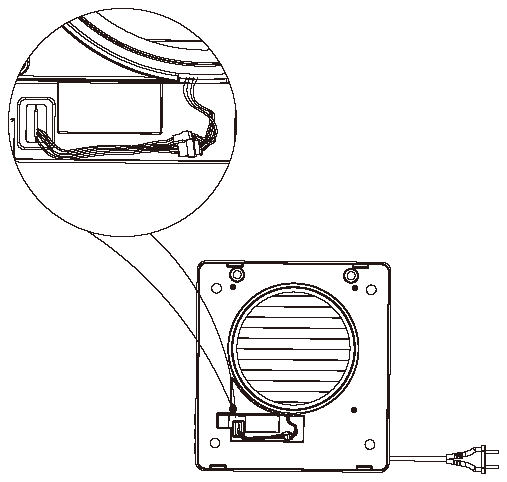
Make sure that the wires are inserted well into the groove on the indoor unit and that they do not protrude to the outside. This may cause a slippage between the indoor unit and the mounting plate.
9. Attach the bottom of the indoor unit to the mounting plate
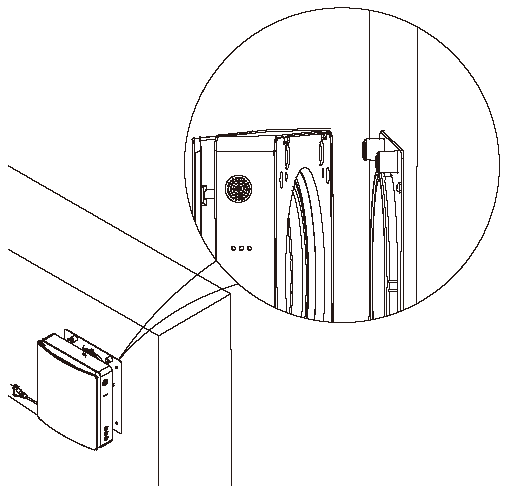
Make sure the bottom of the indoor unit is pushed against the walls. This ensures that the wires do not fall out of the groove and get pinched.
10. Attach the magnets on top
Then press the top of the indoor unit against the magnets.
The indoor unit has two holes that pass over the magnets on top of the mounting plate. These ensure that the indoor unit is in place.
Operation
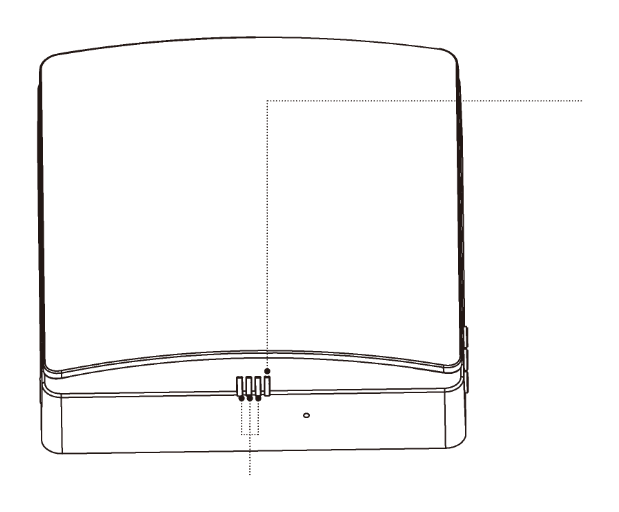
Function light
This indicates the fan speed, 3 speeds in total.
Green light indicates supply mode.
Red light indicates exhaust mode.
Blue light indicates ventilation mode (direction alternates between exhaust and supply after 75 seconds of cyclical operation)
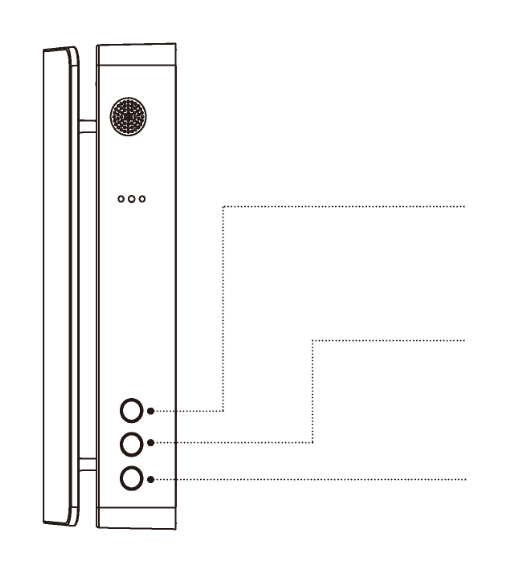
Top button: MODE
Switches between “Exhaust mode”, “Supply mode” and “Ventilation mode”.
Middle button: FAN SPEED
Switches between 3 different fan speeds.
Lower button: ON/OFF
Turns the room fan on or off.
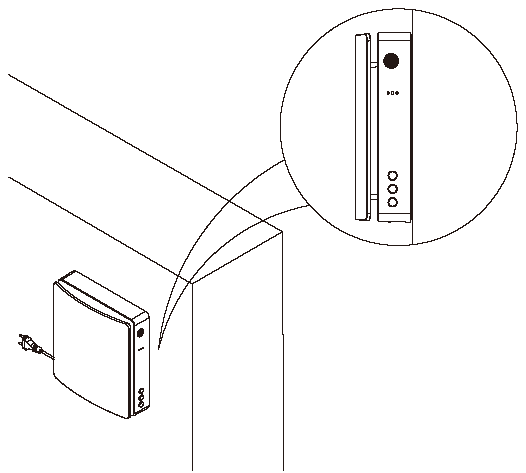
Status light
If the room fan is turned on
Blue light: Pairing mode is activated, and communication between the master and slave units is achieved.
Green light: The IoT function is activated, WiFi is connected, and the room fan is available to be controlled from the connected app.
Red light: Filter cleaning alarm to remind you that it is time to clean or replace the air filters.
Purple light: Indicates the master role in master-slave connection mode. Master control over the internet is enabled.
Green light flashes slowly: Automatic ventilation function is on and running.
Blue light flashes slowly: “Free Cooling” is activated and working.
Red light flashes three times: Indicates that filter cleaning is complete and the cleaning time has been reset.
If the room fan is turned off
Blue light flashes slowly: Indicates the device's role is set as master in pairing mode.
Green light flashes slowly: Indicates the role of the device set as slave in pairing mode.
Red light flashes slowly: Indicates that the device is in WiFi connection mode.
Operating modes
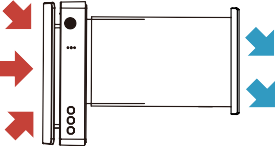
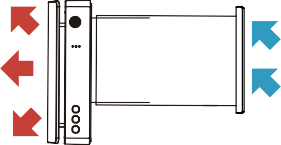
Supply mode (“Supply”) or exhaust mode (“Exhaust”). The room fan operates in exhaust or supply mode at the selected set speed. This also applies to both master and slave if two Single Room Ventilators are paired together.
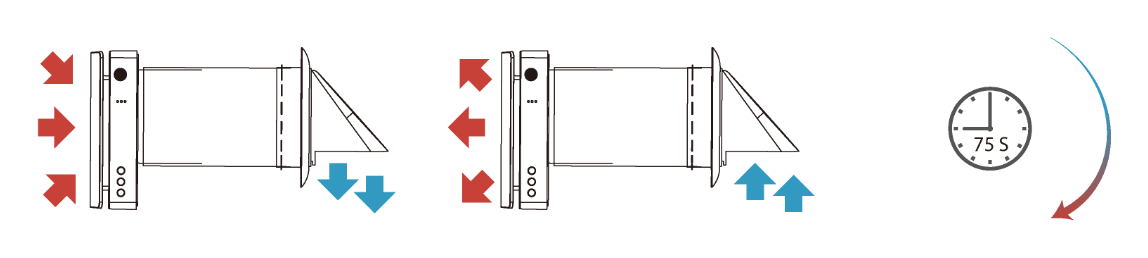
Ventilation mode (“Heat recovery”). The room fan runs for two cycles of 75 seconds each. This mode is effective in providing heat to the heat exchanger and should be used in winter to maintain good energy recovery.
When two connected ventilators are operated synchronously (master-slave connection), one room ventilator runs in supply mode and the other room ventilator runs in extract mode:
- Interval 1. The warm polluted air is extracted from the room for 75 seconds and passes through the ceramic regenerator. This gradually absorbs heat and moisture. After 75 seconds, the ventilator switches to air supply mode.
- Interval 2. The fresh and cold outdoor air passes through the heat exchanger for 75 seconds and absorbs accumulated moisture and heat. When the heat exchanger becomes cold, the ventilator switches to extract mode.
Extraction mode / Supply mode
Remote control
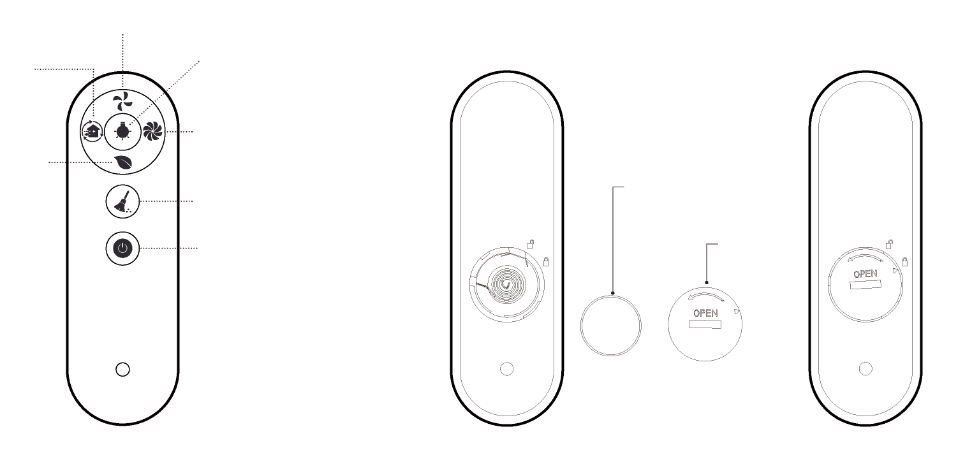
- CR2025 battery
- Cover
- Fan speed
- Light indicator OFF/ON
- “Fan boost”
- Reset filter indicator
- ON/OFF
- Ionization (optional)
- Mode
- ON/OFF: Turn the room fan on or off.
- Fan speed: Change the fan speed of the room fan, a total of 3 fan speeds.
- Working mode: Change the working mode of the room ventilator (choose between supply mode, extract mode or ventilation mode).
- Ionization: Turn the negative ion generator on or off. For models with it.
- Turn the LED indicator on the room fan's indoor unit on or off.
- “Fan Boost”: The fan operates at maximum power if there is no other setting. The room fan operates for 30 minutes before the mode automatically turns off.
- Reset filter indicator: After inspecting or replacing the Fine filter in the air duct, press and hold the button for 5 seconds to reset the indicator. The red light on the side of the indoor unit will flash three times and the hour counter will be automatically reset. The room ventilator will automatically notify you of inspection 720 hours after the light is reset.
This remote control uses infrared signals.
- Before using the remote control, the battery must be inserted into its position on the back of the remote control.
- After inserting the battery, screw the battery cover clockwise as indicated on the cover. Use a suitable tool to close the cover to avoid injury to your hands.
- To remove the battery, turn the battery cover counterclockwise as shown on the back of the cover. Once the cover is loosened and removed, the battery can be removed.
- Keep the remote control away from children to prevent children from swallowing the batteries and causing accidents.
Connecting to WiFi
- Download Smart Life in the App Store or Google Play.
- Before enabling WiFi control, you must connect your mobile phone to WiFi (2.4 Ghz), turn on the Bluetooth function on your mobile phone and make sure that both the room ventilator and the mobile phone are within the same WiFi network.

- When the room fan is completely turned off, press and hold the ON/OFF button for 5 seconds until the status indicator flashes red slowly. It is now ready to connect to WiFi.
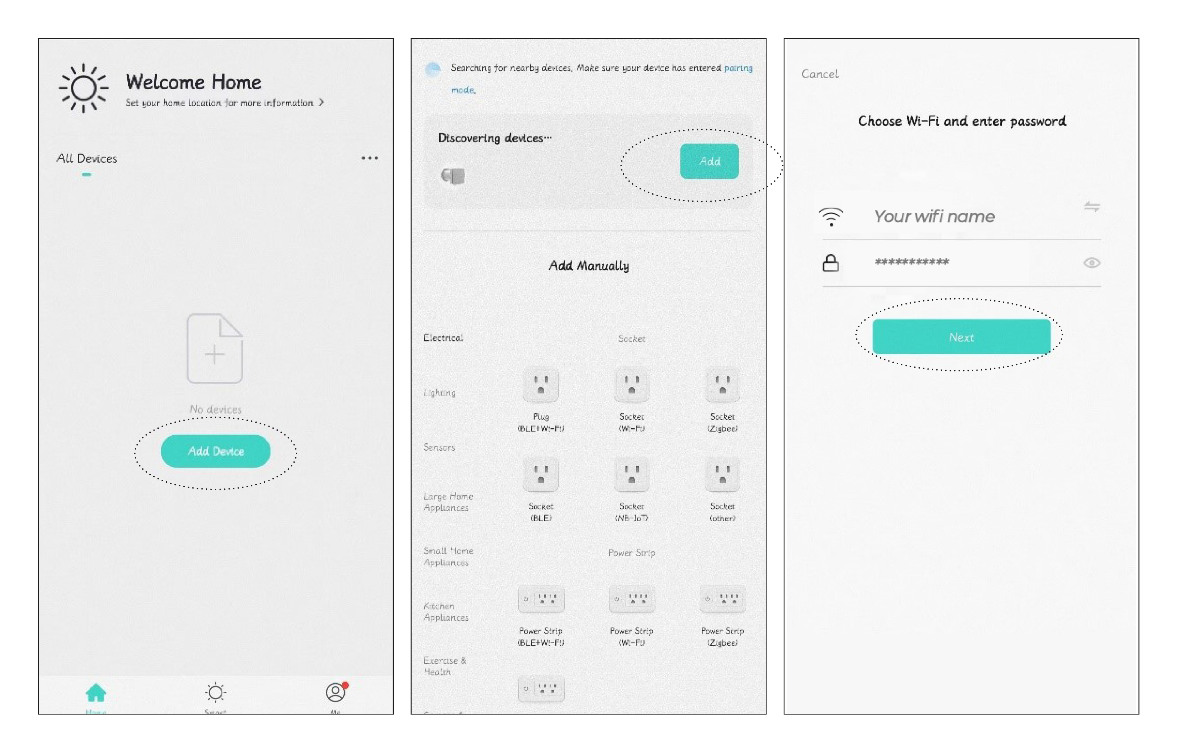
- Open the “Smart Life” app and create a user or log in. Go to the “Home” page, click the plus sign (+) in the right corner, and press “Add Device”.
- At this time, Smart Life (app) receives the signal from the room fan. If the room fan is set to the correct connection mode and Bluetooth is activated on the phone, it will automatically appear in the app.
- Click on you next and enter your WiFi information if necessary.
- After successful WiFi connection, you will find the room fan among your devices on the home screen (“Home”) in Smart Life (app).
Both the room fan and the mobile phone must be within the same 2.4 Ghz WiFi network for the room fan to be remotely controlled.
Features in the app
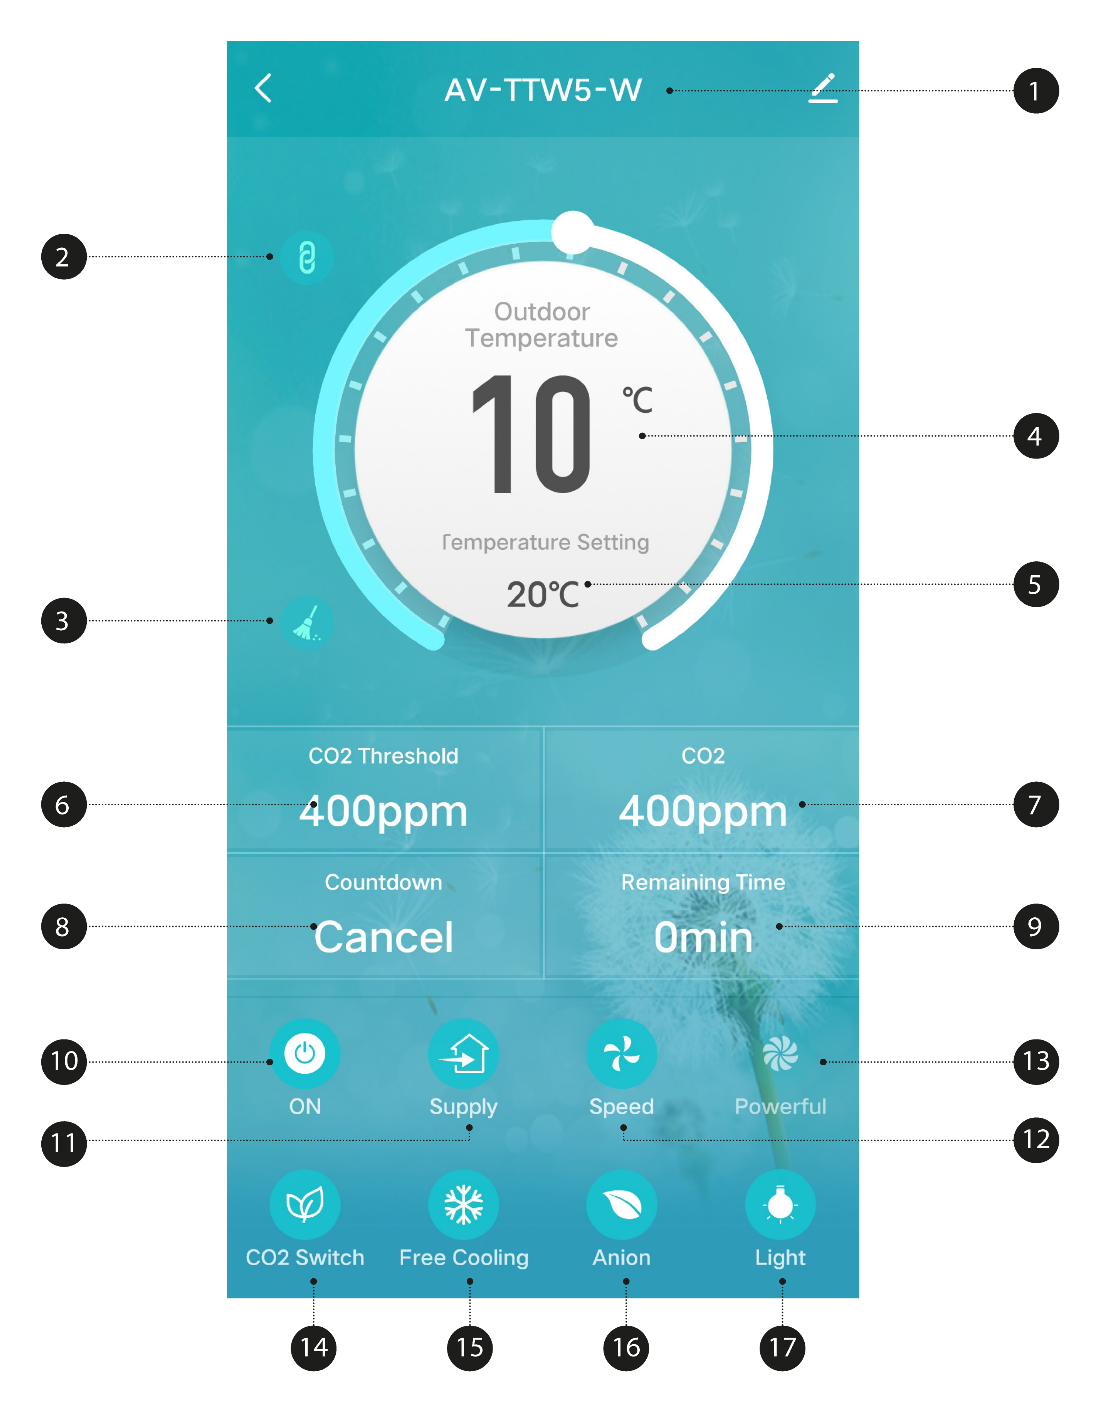
- Name of Single Room Ventilator . The app can connect to multiple devices, and each device will have a unique name. You as a user can change the device name yourself by tapping the pencil to the right of the name.
- Master-slave connection. After two Single Room Ventilators are connected, this icon appears. The slave is thus disconnected and cannot be operated alone.
- Filter alarm. The alarm reminds the user to clean or replace the filters. The icon disappears after resetting on the remote control (press and hold the button).
- Outdoor temperature. The outdoor temperature is displayed here when the unit is switched on and running in supply or ventilation mode. In extract mode, the outdoor temperature is not recorded and displayed.
- “Free Cooling” temperature setting. When the outdoor air is comfortable, it will operate in supply mode to supply fresh air without heat recovery. Users can set the temperature themselves to activate this function. The setting range is between 10°C and 29°C.
- Desired CO2 concentration. If the indoor CO2 concentration exceeds the set value while the room ventilator is in ventilation mode, it will activate the supply mode to supply fresh air. This will reduce the CO2 concentration in the air, and the mode will work until the CO2 concentration is lower than the set value. Then it returns to the previous mode. The desired CO2 concentration can be set between 400 to 2000 ppm.
- Real-time indoor CO2 value.
- Countdown. Let the room fan work with up to a 12-hour countdown.
- Remaining time of the countdown.
- Turn the room fan on or off.
- Operating mode. Choose between supply mode, extract mode or ventilation mode.
- Fan speed, total of 3 speeds.
- “Fan Boost” mode. The room fan will supply/exhaust at the highest speed.
- CO2 concentration function ON/OFF.
- “Free Cooling” ON/OFF.
- Ionization ON/OFF (accessory)
- LED indicator lights ON/OFF.
Disconnecting from WiFi
- Go to the Home screen and long press the device to disconnect from WiFi. The option to remove the device will appear at the bottom of the screen.
- Click “Remove Device” to remove the device, and confirm by pressing “Confirm”. Press “Cancel” if you do not want to disconnect the room fan from WiFi.
How to connect two Single Room Ventilators in series
If you want two Single Room Ventilators are going to talk to each other, you can connect them as master and slave in one series. You can have a maximum of two units per series. This way you can control so that one Single Room Ventilator blows air into the room at the same time as the other room fan extracts air.
The maximum recommended distance between Single Room Ventilators that can be connected is 15 meters. The master can only control one slave alone. The signal can pass between max. 180 mm thick walls.
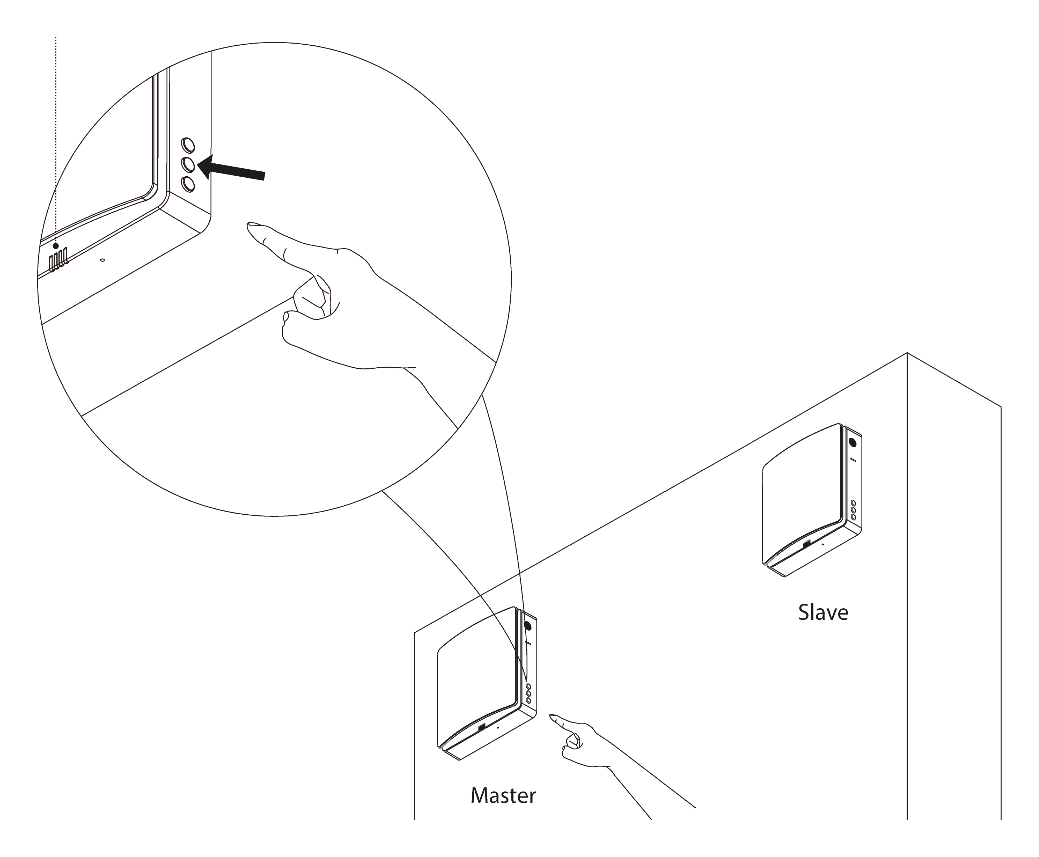
1. Activate the master device
Connect the room fan to power. In the off state, press and hold the fan speed button on the unit for 5 seconds. The blue status indicator will start flashing slowly to indicate that the room fan is entering a master-slave connection mode.
Now this room fan is set to the master role.
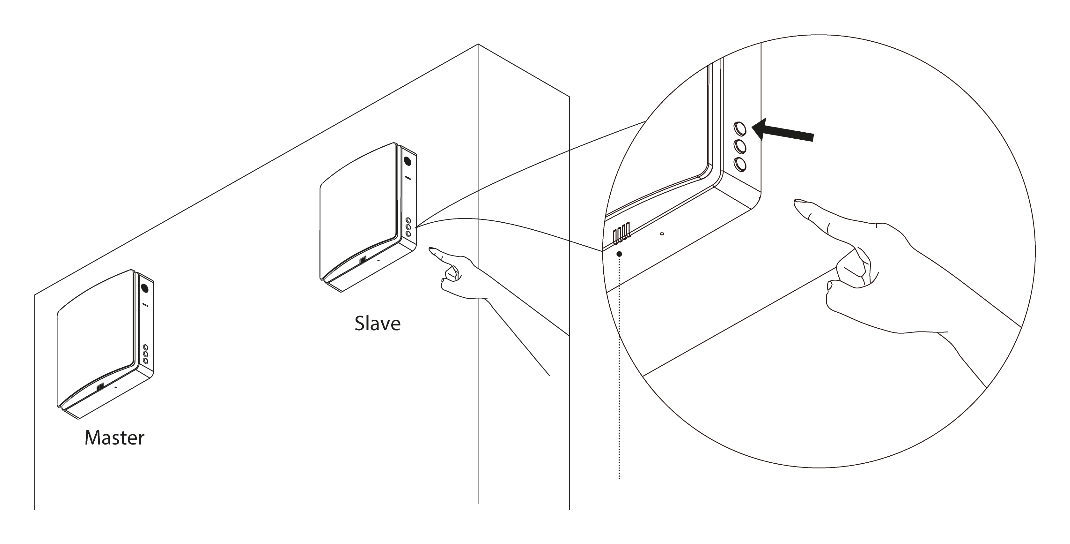
2. Connect to slave
Connect the room fan to power. In the off state, hold the mode button on the unit for 5 seconds. The green status indicator will start flashing slowly to indicate that the room fan unit is entering master-slave connection mode.
Now this room fan is set to the slave role.
The status light on both room fans will change to a steady blue light to indicate that the master-slave connection is successful. If the master-slave connection fails, the status lights on the room fans will flash for one minute and then automatically turn off.
The pairing of master and slave should be done simultaneously within a period of 1 minute. The room ventilators should be as close to each other as possible so that they automatically find each other.
How to disable two Single Room Ventilators in series
Connect both room fans to power. In the off state, press and hold the fan speed button on the linked device for 5 seconds. The device's blue status indicator flashes slowly, and at this time, the linked device enters the master-slave connection mode. This process should be performed simultaneously on both devices for a limited time (within 1 minute). When the status indicators turn off, the devices are not connected to each other. At this stage, the devices are reset and they are zeroed without any role definition
Master/slave device control

- Without having set a master/slave role, one remote control can control one or more devices.
- After master/slave connection, the current use of the remote control can only control the master, and the master will send synchronization signals to the slave (the slave does not receive the remote control signal), so that the slave's mode is synchronized with the master's mode.
- In ventilation mode, the operating direction of the slave is the opposite of the operating direction of the master. In other modes, the direction of the slave is the same as the direction of the master.
When two Single Room Ventilators are connected, they will function as one installation. In the app, they will only appear as one Single Room Ventilator with series connection indicator activated.
Maintenance
The heat exchanger must be cleaned regularly to ensure the best possible heat recovery.
Detach the indoor unit from the mounting plate, and disconnect the wires of the indoor unit from the core. Remove the indoor unit and pull the core out from the wall. Carefully pull the small ropes on both sides of the ceramic heat exchanger and fine filter, and take the fine filter and heat exchanger out from the core.

| Component | Maintenance |
|---|---|
| Pre-filter | Clean monthly or as needed. Replace after 3 years. Must be cleaned more often if the air contains a lot of impurities. |
| Fine filter | Inspect when the indicator on the product lights up. Replaced every 3 months or more often. Must be cleaned or replaced more often if the air contains a lot of impurities. |
| Heat exchanger | Vacuum and rinse under running water every 3 months. Must be cleaned more often if the air contains a lot of impurities. |
| Fan blades | Clean once a year or as needed. |

- Pre-filter (vacuum-cleanable)
- The heat exchanger can be rinsed with cold water. Make sure it is completely dry before putting it back into the core.
- Heat exchanger (vacuum/rinseable)
- Fine filter (vacuum or replace)
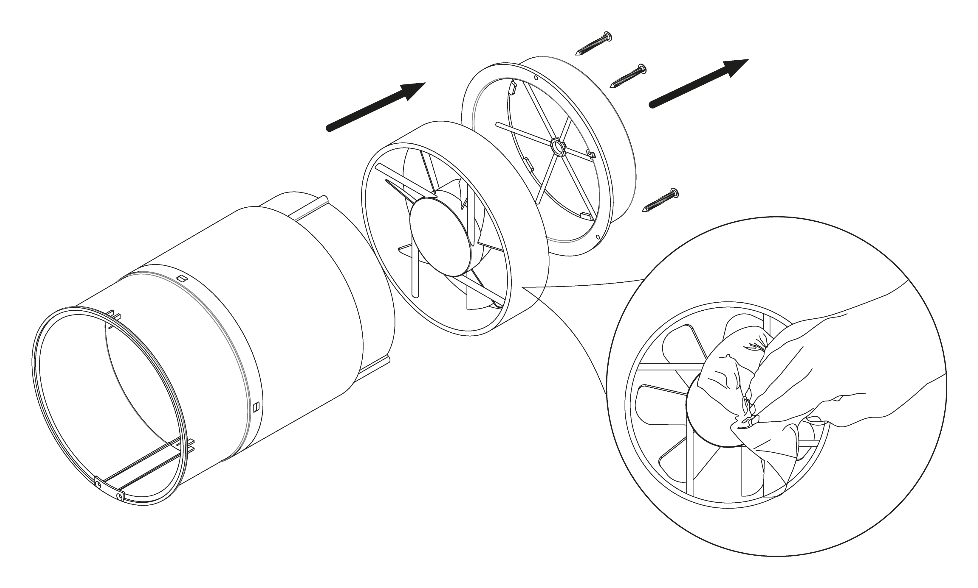
How to clean the fan blades
Remove the fixed bracket in the inner duct and pull out the fan.
Clean the fan blades. Use a soft brush, microfiber cloth, or vacuum cleaner to gently clean the fan blades. Do not use harsh cleaners, solvents, or sharp objects. The fan blades should be cleaned once a year.
Storage and transportation
Store the room fan in its original packaging in a dry place when not in use or when transporting.
The storage environment must be free from aggressive vapors and chemical mixtures that can cause corrosion and deformation. Comply with the handling requirements applicable to the type of shipment in question.
Technical data
| Description | Unit | Value |
|---|---|---|
| Voltage | V | 220-240 |
| Frequency | Hz | 50 / 60 |
| Power consumption | W | 6 / 7 / 7.8 |
| Current strength | A | 0.04 / 0.05 / 0.06 |
| Fan speed | RPM | 1,000 / 1,550 / 1,800 / 2,200 (BOOST) |
| Wall thickness | etc. | Min. 270 mm (with extension tube 390 – 700 mm) |
| Airflow (L/M/H) in supply/extract mode (with fine filter F7) | m3/hour | 20 / 40 / 50 |
| Airflow (L/M/H) in ventilation mode (with fine filter F7) | m3/hour | 10 / 20 / 25 |
| Max airflow (“Fan Boost”) | m3/hour | 60 |
| Sound level | Db(A) | 19 – 32.7 |
| Heat exchanger efficiency | % | Until 97 |
| IP rating | – | IPX4 |
| Air pipe diameter | etc. | 158 |
| SEC classification | – | Class A |
| Assembly | – | On the wall |
| Net weight | kg | 4.2 |
Troubleshooting
| Error | Possible cause | Troubleshooting |
|---|---|---|
| Condensation/frost on the indoor unit and/or ticking noise. | Moist air freezes into ice and settles on the fan blades and/or the indoor unit. | Set the room fan to exhaust mode for approximately 1-2 hours. |
| The fan does not start. | No power connection. | Make sure the ventilator is properly connected to power. |
| The fan does not start. | The fan motor is stuck or the fan blades are clogged. | Turn off the fan. Troubleshoot the fan motor for hair or other obstructions and remove them. Restart the fan. |
| Reduced effect. | Low fan speed setting. | Set a higher speed. |
| Reduced effect. | Air filters, fan motor or heat exchanger are dirty. | Clean or replace the filter, and clean the fan and heat exchanger. |
| Noise and/or vibration. | The fan blades are dirty. | Clean the fan blades. |
| Noise and/or vibration. | Loosen the screw on the installation. | Tighten all screws on the room fan. |
| Master/slave connection failed. | The connection has already been made by someone else. | Reset the devices, unplug them, wait a few minutes, and try again. |
| Master/slave connection failed. | Other | Reset the devices, unplug them, wait a few minutes, and try again. |
| Master/slave connection failed. | The room ventilator is surrounded by a lot of metal or concrete. | This can weaken the wireless signals. |
| Master/slave connection failed. | The distance between Master and Slave units is too long. | Install the units with the spacing described in this user guide. |
| WiFi connection failed. | The mobile phone is connected to a 5 Ghz internet. | Activate 2.4 Ghz on the router and connect your mobile phone to this internet. |
| WiFi connection failed. | The mobile phone is connected to a public internet. | Configure your WiFi router correctly. |
| WiFi connection failed. | The router is not set up correctly. | Configure your WiFi router correctly. |
| WiFi connection failed. | The router is set to a high security level. | Configure your WiFi router correctly. |
| WiFi connection failed. | You have exceeded the limit of devices that can be connected to the router. | Configure your WiFi router correctly. |
| WiFi connection failed. | Bluetooth on the mobile phone is off. | Activate Bluetooth on your mobile phone. |